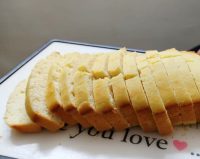
Let me start by admitting that breads are time taking; it teaches you patience. It was one of the first things my mum wanted me to learn; reasons still unknown. No one would want to make a bread at their home, considering the efforts it requires and how easily available it is in the market. However, Milk breads are not as common in India as other regular breads. Milk breads are softer and are enriched with milky sweetness.
I saw multiple YouTube videos before starting with my experiment here. So, I won’t be able to give you a single link for the recipe. Even so, I have the exact recipe that I followed and you can give it a try. Always remember, measurements are crucial when baking something like bread as its the dough that has to be made right.
Here’s my recipe of Egg-less Milk Bread:
Wet ingredients:
- 165gms Warm Milk
- 1 TSP Sugar
- 3gms Instant Dry Yeast
Mix it well and keep it aside for 5-10 mins for yeast to ferment. Keep in mind that milk shouldn’t be too hot or it can kill your yeast; you won’t get any raise in the dough if that happens. Fermented yeast looks like foam.
Dry ingredients:
- 220gms of Maida/ All purpose flour
- 15gms Powdered Sugar
- 1 TSP Salt
- 1 TBSP Milk Powder

Now add your fermented yeast in the middle of your dry ingredients and make a dough using your fingers. It will be gooey in the beginning but as you start kneading, dough will start loosing it’s stickiness. It can require anywhere between 5-15 mins for the dough to form gluten depending upon the atmosphere and warmth of your hand. When you notice that the dough is no longer sticky, you can make a ball of it and put in an oil greased bowl. Cover the bowl and let the dough rest for 45-50 mins, not more than an hour.
After an hour your dough should have got good raise. If not, the probable cause would be yeast. Always remember that it is very important to knead dough with hands as warmth of the hands helps yeast with the raise.
Considering that you have got a raised dough in your hands, I’m gonna tell you to do something you won’t like.
Punch the dough and break into that really good looking raise. Heart breaking, right? First I’m asking you to get a good raise and now this. Well, In my defense that’s how you can get a fluffy bread. Again, knead the dough for 2-3 mins and shape it as per you bread tin; make sure there is no visible lines on the shaped dough. Now put it in your greased bread tin and cover the tin. Yes, it may look that the dough isn’t occupying much of the tin space but let that be for another hour.
After an hour, your dough should have been doubled it size inside the tin. Phew!!
Your bread is now ready for the oven. Just brush some milk on the top of the dough before putting it into the oven.
Preheat oven at 180° and bake the bread for 20-22 mins and it should be ready.
PS:After your bread is baked, let it cool for at least 2 hours before serving.


It’s going to be ending of mine day, however
before ending I am reading this enormous post
to improve my know-how.